
Steering problems can sneak up on you. One day your car feels perfectly responsive. The next, you notice a small puddle under the front end or a strange stiffness when turning. In many cases, the culprit is an internal leak in the rack and pinion system. This guide walks you through everything you need to know to identify, diagnose, and fix the problem efficiently.
What Is a Rack and Pinion System?
The rack and pinion is the heart of most modern steering setups. It connects your steering wheel to your front wheels through a simple but clever mechanism. A pinion gear rotates as you turn the wheel. This rotation moves a toothed bar called the rack from side to side. That movement steers the wheels left or right.
Most modern vehicles use power-assisted versions of this system. Hydraulic pressure from a pump helps reduce the effort needed to steer. Therefore, when a leak develops inside the unit, the entire steering experience changes for the worse.
Signs of an Internal Rack and Pinion Leak
Catching a leak early saves money and prevents bigger problems. However, internal leaks can be harder to spot than external ones. Here are the most common warning signs to watch for:
- Fluid spots or puddles on the ground beneath the front of the vehicle
- A whining or groaning noise when turning the steering wheel
- Stiff or heavy steering, especially at low speeds
- A steering wheel that wanders or feels loose on straight roads
- Low power steering fluid that needs frequent topping off
Additionally, you may notice wet, oily patches on the rack housing itself. This happens when seals break down and allow fluid to seep past internal components.
Why Internal Leaks Happen
Understanding the cause helps you fix the problem properly and avoid repeating it.
Seals and O-rings are the most common failure points. Over time, rubber degrades. Heat cycles, age, and contaminated fluid all speed up this process. Once a seal loses its elasticity, it can no longer hold pressure. Fluid then bypasses it internally.
Worn rack bushings are another contributor. These small components support the rack as it moves back and forth. When they wear out, the rack shifts slightly under load. This extra movement puts stress on the seals. Eventually, the seals give way.
Contaminated power steering fluid also plays a role. Dirty fluid contains particles that act like sandpaper on internal parts. Therefore, keeping your fluid clean and at the correct level is one of the simplest ways to extend the life of your steering system.
Tools and Materials You Will Need
Before starting any repair, gather everything in advance. Having the right tools on hand makes the job faster and safer.
- Floor jack and jack stands
- Socket set and combination wrenches
- Tie rod end puller
- Torque wrench
- Steering rack seal kit (specific to your vehicle)
- Power steering fluid (correct type for your car)
- Clean rags and a drain pan
- Thread locker compound
- Safety glasses and gloves
Always check your vehicle’s service manual for torque specifications and any model-specific steps before beginning.
Step-by-Step Repair Process
Step 1: Prepare the Vehicle Safely
Park on a flat, stable surface. Engage the parking brake. Loosen the front lug nuts slightly before lifting the vehicle. Raise the front end with a floor jack and secure it on jack stands. Never work under a car supported only by a jack.
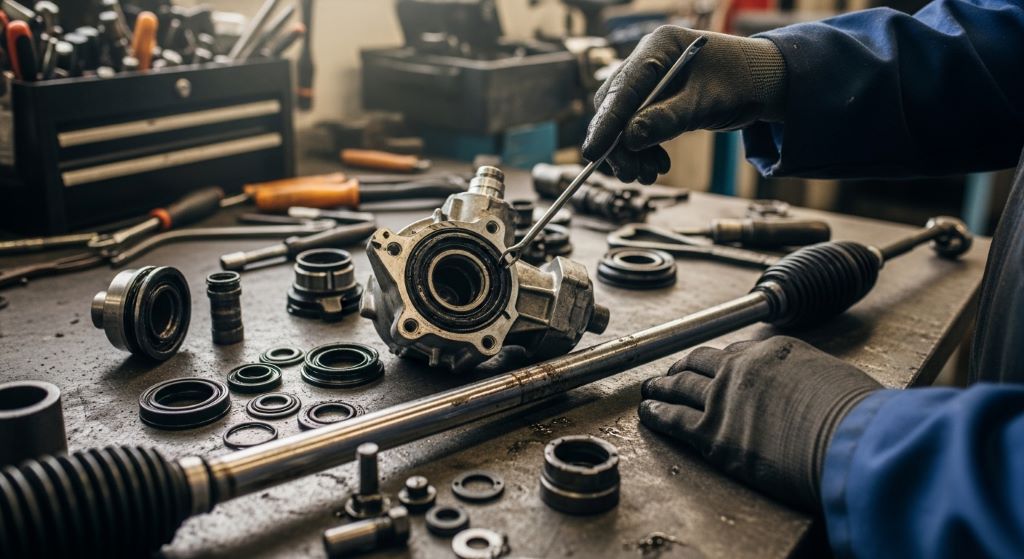
Step 2: Remove the Steering Rack
Disconnect the steering shaft from the pinion. Then remove the tie rod ends on both sides using the tie rod puller. Unbolt the rack mounting brackets and carefully lower the rack from the vehicle. Mark the position of any adjustable components before removal so you can reassemble them in the same place.
Step 3: Disassemble the Rack
Work on a clean, flat bench. Remove the tie rod ends and boots. Then take off the end caps and carefully pull out the rack shaft. Take photos as you disassemble so you have a reference for reassembly.
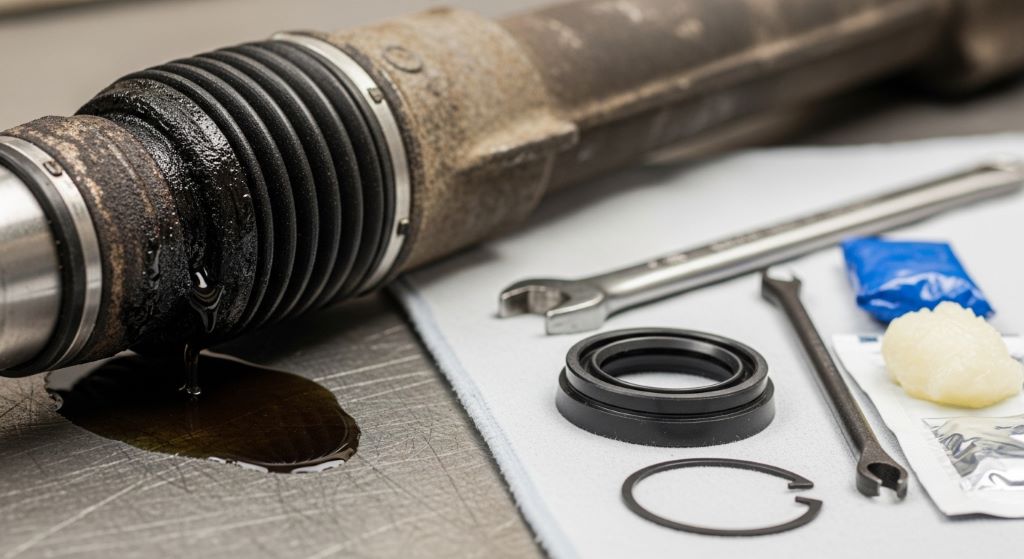
Step 4: Inspect and Replace the Seals
Examine every seal, O-ring, and bushing in the assembly. Replace all of them even if some look intact. Seals that look fine can still fail shortly after reassembly under pressure. Use only the parts included in the correct seal kit for your specific vehicle model.
Additionally, inspect the rack shaft and housing bore for scoring or deep grooves. Light surface marks are acceptable. Deep scratches, however, mean the rack itself is worn and may need replacement rather than just resealing.
Step 5: Reassemble the Unit
Lightly lubricate new seals with clean power steering fluid before installing them. This prevents tearing during assembly. Install each seal carefully using the correct driver or a smooth socket that matches the seal diameter. Avoid metal-to-metal contact with the sealing lip.
Reassemble the rack in the reverse order of disassembly. Torque all fasteners to the manufacturer’s specifications. Use thread locker on bolts that could loosen from vibration.
Step 6: Reinstall the Rack
Lift the rack back into position and bolt the mounting brackets securely. Reconnect the tie rod ends and set them to the previously marked positions. Reconnect the steering shaft to the pinion and tighten the pinch bolt to spec.
Step 7: Refill and Bleed the System
Refill the power steering reservoir with fresh fluid. Then start the engine and slowly turn the steering wheel from lock to lock several times. This bleeds air from the system. Check the fluid level again and top off as needed.
Step 8: Inspect for Leaks
With the engine running, have someone turn the wheel while you inspect the rack and all connections for any signs of leaking. Address any drips before returning the vehicle to the road.
Step 9: Check the Alignment
Any time the rack or tie rod ends are disturbed, wheel alignment changes. Take the vehicle to an alignment shop before driving it at highway speeds. Proper alignment protects your tires and ensures safe handling.
When to Replace Instead of Repair
Sometimes resealing is not enough. If the rack housing is cracked or the rack shaft shows deep scoring, replacement is the better choice. Additionally, if the pinion gear teeth are worn or chipped, no amount of sealing will restore proper steering feel.
A remanufactured rack and pinion unit is often a cost-effective alternative to a brand-new one. These units are rebuilt to factory specifications and typically come with a warranty. Therefore, weigh the cost of parts and labor for a reseal against the price of a rebuilt unit before deciding.
Preventive Maintenance Tips
Good habits extend the life of your steering system considerably.
- Check power steering fluid level monthly and top off with the correct fluid type
- Flush and replace the power steering fluid every 50,000 miles or as recommended
- Inspect the rack boots regularly for cracks or tears that could let in dirt and moisture
- Listen for changes in steering feel and investigate unusual noises promptly
- Avoid running the system at full lock (wheel turned all the way) for extended periods
These small steps prevent major repairs down the road.
Conclusion
Internal leaks in a rack and pinion system are a common but very manageable problem. By recognizing the early warning signs, gathering the right tools, and following a careful step-by-step process, most experienced DIYers can perform this repair successfully. However, always prioritize safety by using proper jack stands and torquing fasteners correctly. Replace all seals and O-rings at once, keep your fluid clean, and schedule a wheel alignment after any steering work. Taking these steps helps ensure your vehicle steers safely and precisely for many miles to come.
Frequently Asked Questions
How do I know if my rack and pinion is leaking internally versus externally?
External leaks are usually visible on the outer surfaces of the rack housing or around the boots. Internal leaks are harder to see. However, they often show up as a need to frequently top off fluid, stiff steering, or a groaning noise when turning, even without obvious fluid on the ground.
Can I drive with a leaking rack and pinion?
It is not recommended. Even a slow leak can eventually cause the power steering system to run low on fluid. This puts extra strain on the pump and can lead to complete loss of power steering assist. In severe cases, it can make the car difficult to control at low speeds.
How long does a rack and pinion reseal typically last?
A quality reseal using OEM-spec seals can last many years when the rack shaft and housing are in good condition. However, if the root cause was contaminated fluid or a worn shaft, the new seals may not last as long. Maintaining clean fluid greatly extends seal life.
Is it better to reseal or replace the rack and pinion?
If the rack shaft and housing bore are smooth and undamaged, resealing is a cost-effective fix. However, if there is scoring, worn gear teeth, or a cracked housing, replacement with a remanufactured unit is the smarter long-term choice.
What type of power steering fluid should I use after the repair?
Always use the fluid type specified in your owner’s manual or on the power steering reservoir cap. Many modern vehicles require specific formulations. Using the wrong fluid can damage seals and accelerate future leaks.
Related Topics:
How to Remove a Stuck Oil Filter with the Hyper Tough Oil Filter Wrench (Step-by-Step Guide)
How to Make Homemade Car Air Freshener: A Complete DIY Guide