

A dead car battery is one of the most frustrating problems a driver can face. It often happens without warning, and it can leave you stranded at the worst possible time. Fortunately, testing your car battery at home is easier than most people think. All you need is a reliable multimeter and a few minutes.
In 2026, multimeters have become more affordable and more accurate than ever before. Whether you are a seasoned mechanic or a first-time car owner, knowing how to check your battery can save you time and money. This guide will show you exactly how to do it, step by step.
Why Testing Your Car Battery Matters
Your car battery powers everything electrical in your vehicle. It starts the engine, runs the lights, and keeps your electronics working. Over time, batteries lose their ability to hold a charge. This happens gradually, so many drivers do not notice until it is too late.
Regular battery voltage testing helps you catch problems early. It tells you whether your battery is healthy, weak, or on the verge of failure. Additionally, it can help you identify issues with your alternator, which charges the battery while you drive.
Therefore, making battery checks part of your routine maintenance is a smart habit. It costs nothing but a few minutes, and it can prevent an unexpected breakdown.
What Is a Multimeter and How Does It Work?
A multimeter is a device that measures electrical values. It can read voltage, current, and resistance. For car battery testing, you will primarily use the voltage function. Voltage tells you how much electrical potential your battery currently holds.
Modern multimeters come in two types: analog and digital. Analog models use a needle on a dial. Digital models display numbers on a screen. For car battery diagnostics, a digital multimeter is strongly recommended. It gives more precise readings and is easier to interpret.
Most multimeters have two probes. One is red for positive, and one is black for negative. You touch these probes to the battery terminals to get a reading. The process is simple and completely safe when done correctly.
Choosing the Best Multimeter for Car Battery Testing in 2026
Not all multimeters are created equal. When choosing one for car battery work, there are a few key features to look for.
Auto-Ranging Capability
An auto-ranging multimeter automatically selects the correct measurement range. This is especially helpful for beginners. You do not need to manually set the range before taking a reading. It reduces the chance of errors and makes the process much faster.
Display Clarity
Look for a multimeter with a large, backlit display. Car batteries are often located in tight engine bays with poor lighting. A bright, easy-to-read screen makes a real difference. Additionally, a screen that shows decimal values gives you more accuracy.
Safety Rating
Look for a multimeter rated at CAT III or higher. This rating tells you the device is built to handle the electrical demands of automotive work safely. Cheap, unrated multimeters can be dangerous and inaccurate.
Top Picks for 2026
Some of the most trusted auto repair tools in this category include the Fluke 117, the Klein Tools MM400, and the AstroAI AM33D. Each of these models offers accuracy, durability, and ease of use at a reasonable price. The Fluke 117 is widely regarded as the gold standard. However, the Klein and AstroAI models are excellent choices for those on a tighter budget.
Step-by-Step Guide to Testing Your Car Battery
Follow these steps carefully and you will have a clear picture of your battery’s health in just a few minutes.
Step 1: Prepare Your Vehicle
Turn off your car completely. Make sure the engine has been off for at least one hour. This gives the battery time to settle and provides a more accurate resting voltage reading. Additionally, turn off all lights, the radio, and any accessories that draw power.
Step 2: Locate the Battery
Most car batteries are in the engine bay, usually near the front on either side. Some vehicles, however, place the battery in the trunk or under the rear seat. Check your owner’s manual if you are unsure where yours is located.
Step 3: Set Up Your Multimeter
Turn the multimeter dial to the DC voltage setting. Look for a symbol that shows a V with a straight line above it. Set the range to 20 volts if your multimeter is not auto-ranging. This covers the standard 12-volt car battery range comfortably.
Step 4: Connect the Probes
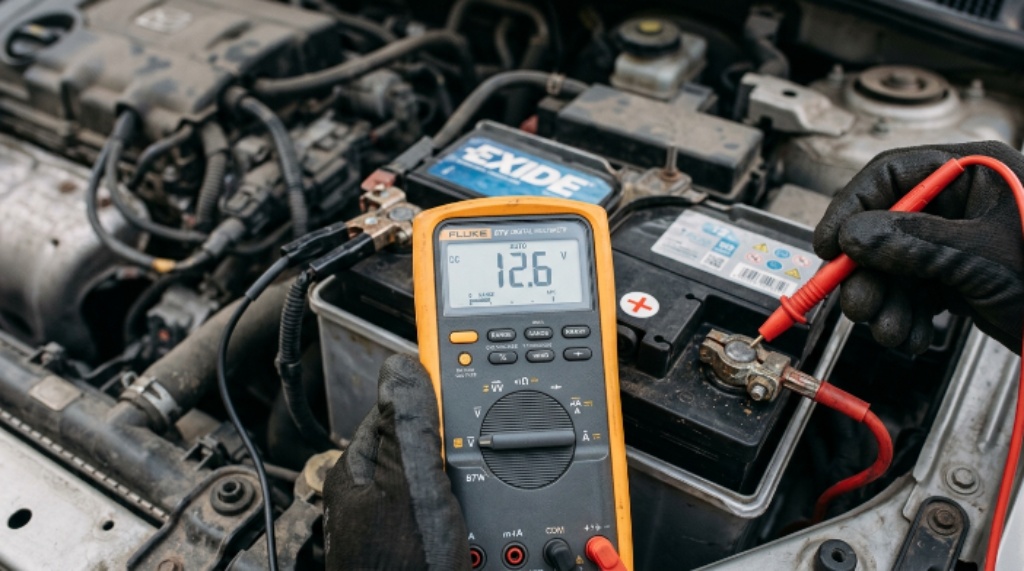
Touch the red probe to the positive terminal. This terminal is usually marked with a plus sign or the letters POS. Then touch the black probe to the negative terminal, which is marked with a minus sign or the letters NEG. Hold both probes firmly in place.
Step 5: Read and Interpret the Results
Look at the reading on the multimeter screen. Here is what the numbers mean:
- 6 volts or higher: Your battery is fully charged and in good health.
- 4 to 12.5 volts: Your battery is about 75 percent charged. It is acceptable but worth monitoring.
- 0 to 12.3 volts: Your battery is running low. Consider charging it soon.
- Below 12.0 volts: Your battery is weak or failing. It may need replacement.
Testing the Battery Under Load
A resting voltage test gives you a baseline. However, a load test tells you how the battery performs when the engine actually demands power. To do this, have a helper start the car while you watch the multimeter.
While the engine cranks, the voltage will drop temporarily. This is normal. However, if the voltage drops below 9.6 volts during cranking, your battery is struggling under load. A healthy battery will recover quickly once the engine is running.
With the engine running, check the voltage again. It should now read between 13.7 and 14.7 volts. This confirms that your alternator is charging the battery correctly. A reading outside this range points to an alternator problem rather than a battery issue.
Common Signs That Your Car Battery Is Failing
Beyond regular testing, there are warning signs you should watch for. Catching these early can help you avoid a no-start situation.
- Slow engine cranking: The engine turns over sluggishly before starting.
- Dimming headlights: Lights appear noticeably weaker, especially at idle.
- Electrical issues: Power windows, infotainment, or other electronics behave erratically.
- Battery warning light: The battery icon on your dashboard stays lit.
- Swollen battery case: Physical swelling indicates internal damage and is a safety hazard.
If you notice any of these signs, run a car battery diagnostics check immediately. Do not wait until the battery fails completely.
How Often Should You Test Your Car Battery?
Most car batteries last between three and five years. Therefore, testing frequency depends on the age of your battery and how often you drive.
For batteries under two years old, testing once or twice a year is usually sufficient. For older batteries, testing every one to three months is a smarter approach. Additionally, always test your battery after extreme weather events. Both very hot and very cold temperatures significantly affect battery performance.
If your car sits unused for more than two weeks, test it before your next drive. Batteries self-discharge over time and can drop to dangerously low levels during long periods of inactivity.
Safety Tips When Working With Car Batteries
Working with car batteries is generally safe, but a few precautions are worth keeping in mind.
- Always wear safety glasses. Batteries contain sulfuric acid that can splash if mishandled.
- Do not smoke or use open flames near a battery. Batteries release hydrogen gas, which is flammable.
- Never connect the probes in reverse. Touching the positive probe to the negative terminal can damage your multimeter.
- Work in a well-ventilated area, especially when the engine is running during a load test.
Conclusion
Testing your car battery with a multimeter is one of the simplest and most valuable skills any driver can learn. It takes just a few minutes, requires minimal equipment, and can prevent costly breakdowns.
In 2026, digital multimeters are accurate, affordable, and easy to use. Choose a quality model with auto-ranging and a clear display. Then follow the step-by-step process outlined in this guide to get a clear picture of your battery’s health.
Remember to test regularly, especially as your battery ages or seasons change. Watch for warning signs and act early. Additionally, always check the alternator voltage while the engine is running to confirm the full charging system is healthy. With these habits in place, a dead battery should never catch you off guard again.
Frequently Asked Questions
1. What voltage should a fully charged car battery read?
A fully charged 12-volt car battery should read between 12.6 and 12.8 volts at rest. Anything above 12.6 volts indicates a healthy, fully charged battery. A reading below 12.0 volts suggests the battery needs charging or may be failing.
2. Can I damage my car by testing the battery with a multimeter?
No. A multimeter only measures voltage and draws virtually no current from the battery. As long as you connect the probes correctly, positive to positive and negative to negative, the process is completely safe for both you and your vehicle.
3. How do I know if my problem is the battery or the alternator?
Test the battery voltage at rest first. If it reads above 12.4 volts but the car still struggles to start, the problem may be the alternator. Start the engine and check the voltage again. A healthy alternator will push the reading to between 13.7 and 14.7 volts. A reading below 13.5 volts with the engine running suggests an alternator issue.
4. Is an expensive multimeter necessary for basic car battery testing?
Not at all. A mid-range digital multimeter priced between $25 and $60 is more than adequate for battery voltage testing at home. You only need a model with a reliable DC voltage function, a clear display, and a CAT III safety rating. Premium models offer added features, but they are not required for basic battery checks.
5. How long does a car battery last before it needs replacing?
Most car batteries last between three and five years under normal conditions. However, extreme temperatures, frequent short trips, and leaving accessories on can shorten this lifespan considerably. Regular testing with quality auto repair tools helps you track battery health over time and plan for replacement before it fails unexpectedly.
Related Topics:
How to Spray Paint a Car Hood Like a Pro Using Budget Tools
How to Rotate Automobile Polishing Pads During Detailing for Better Results